How I Built My Dynamic Cutting Table

When I was planning my dream studio, there was one large piece of the puzzle to fit in; the perfect cutting table. I looked everywhere. I poked around on woodworking sites, lurked in the darkest corners of sewing blogs, and scoured every online furniture site north of the Rio Grande. Nothing came remotely close to what I wanted, but more importantly, needed. If I was going to have the perfect cutting table, I would have to build it.
This post will cover every part of the build process, including some tips I want to keep in mind for (inevitably) rebuilding my own. I will warn you; building this table is not for the faint of heart, and it wasn’t exceptionally cheap. But it’s my favorite part of the studio - the crowning jewel, my Mona Lisa, la pièce de résistance - and I would build it again in a heartbeat.
There were three things I kept in mind when mapping out the table needs.
- Size. The tabletop needed be at least 36" x 54” (standard fabric measurements). After some digging through ergonomics forums (totally normal), it needed it to be 34.37” tall (For reference, I am 5'2").
- Shelves. If I was already sacrificing floor space, I wanted the table to pull double-duty as a storage area. It needed to hold all of my sewing supplies; machines, fabric, and notions.
- Wheels. To make the most of the small square-footage, I wanted the cutting table to easily move around the room and out of the way. This was by far my best idea for the table, functionally speaking.
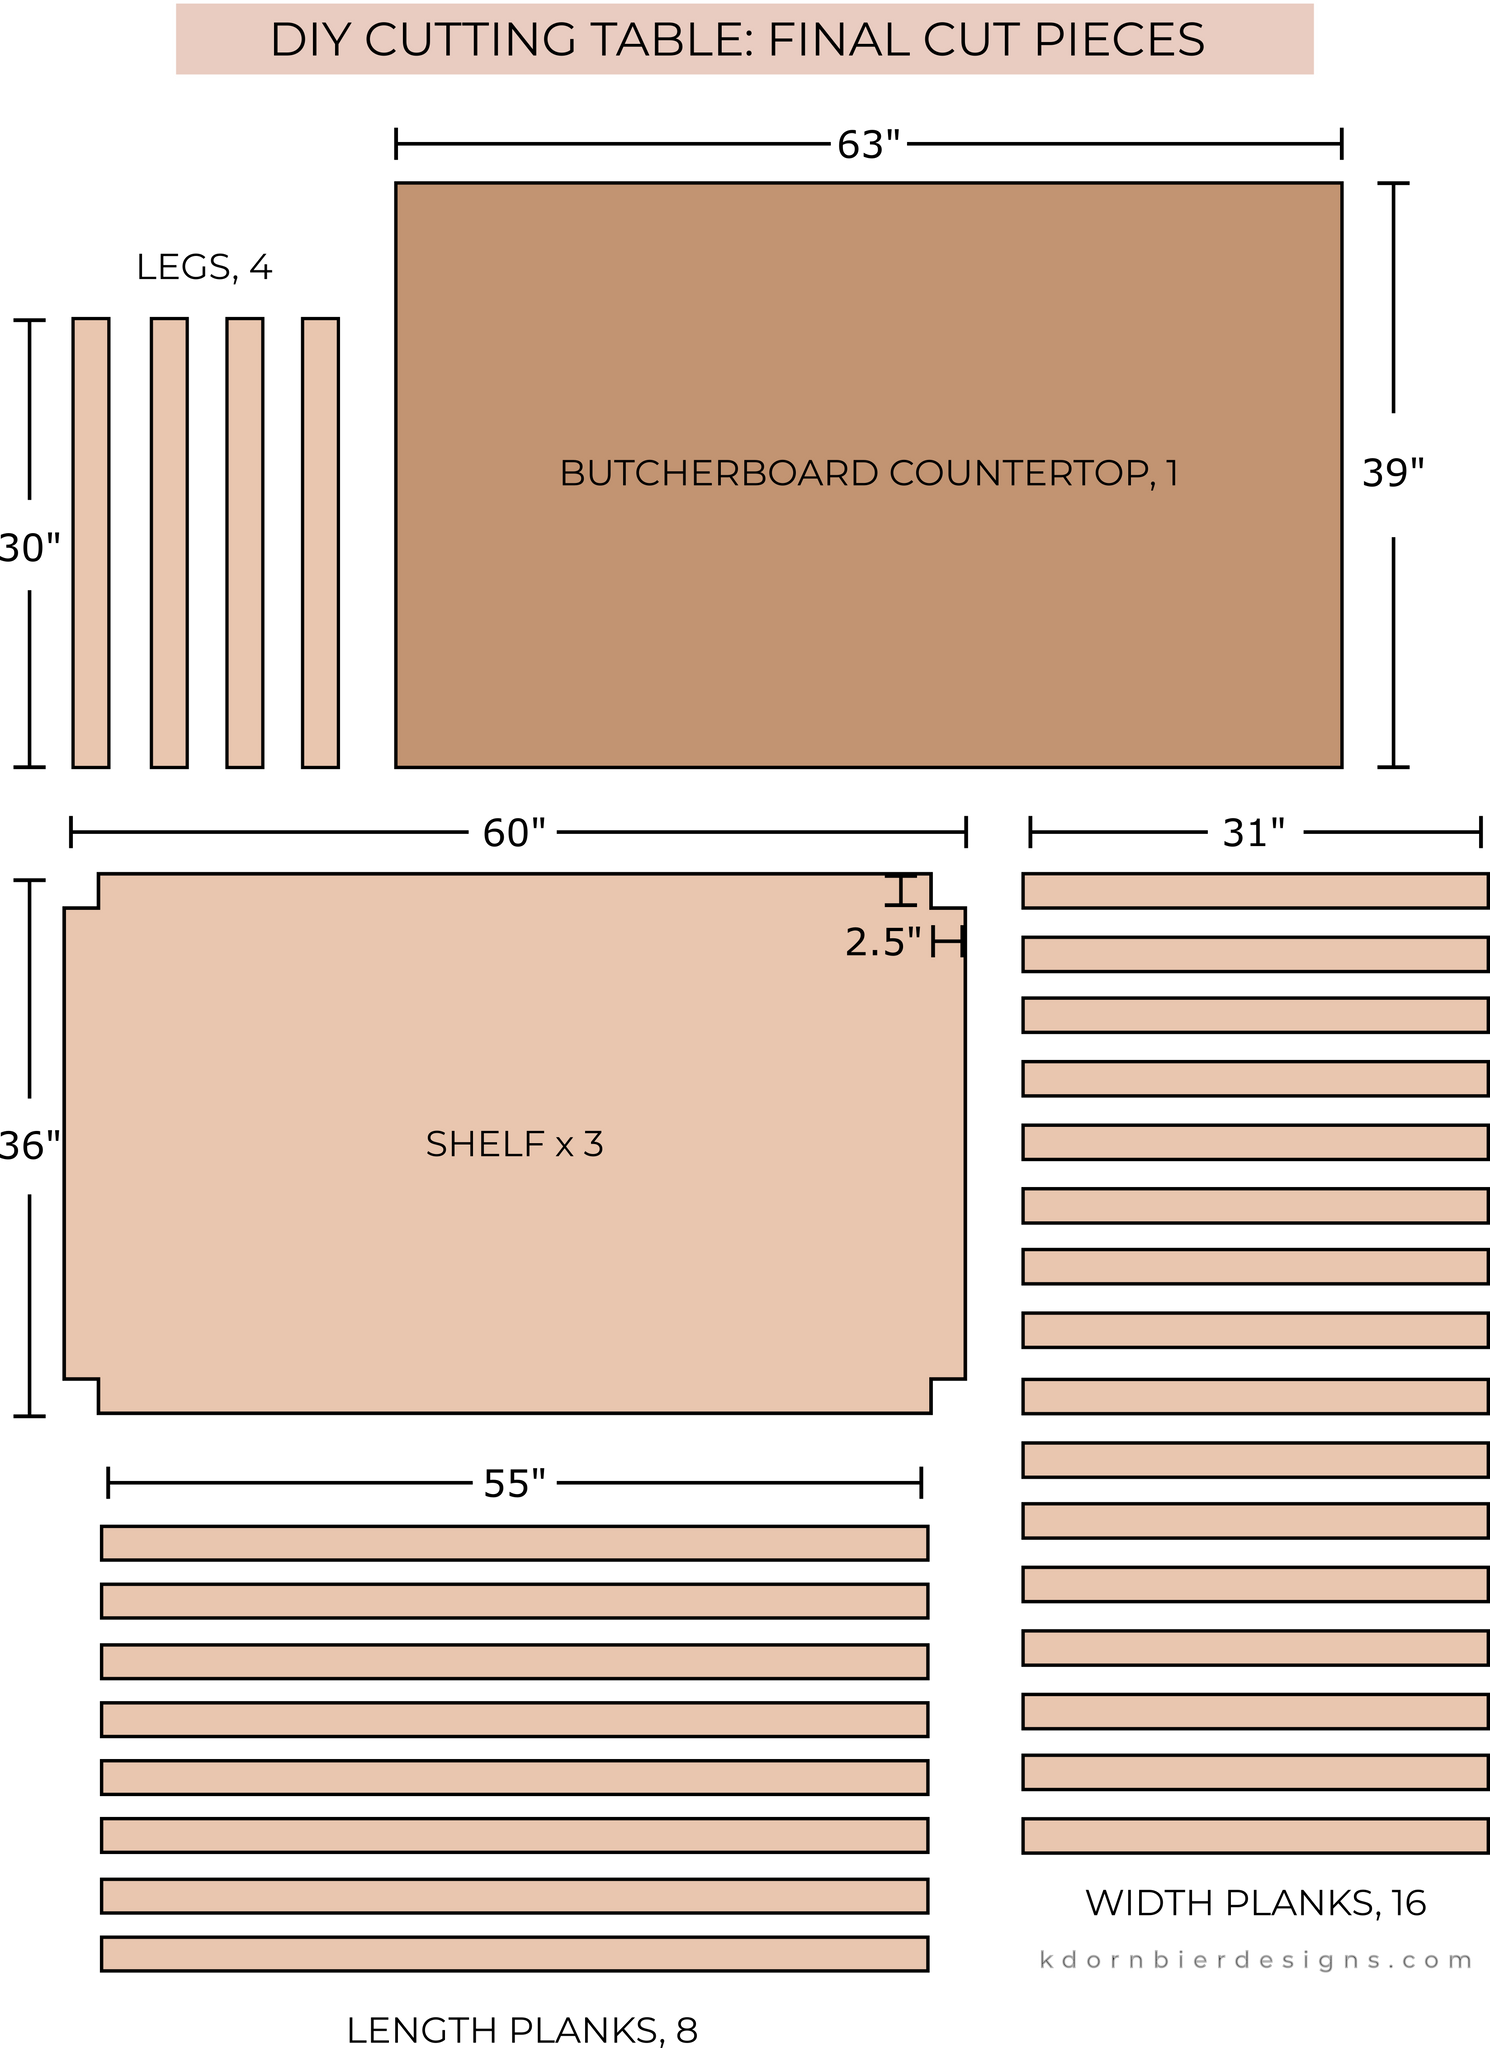
Final Table Measurements
- Table Top: 39” W x 63” L
- Height: 34.37”
- Shelves: 36" W x 60" L
- Top Shelf: 6.125" H
- Middle Shelf: 6.125" H
- Bottom Shelf: 13.25" H
- Note: There is only 1.5” of table top overhang around the table. When sitting on a stool, there’s not any room for my knees underneath. I stand 90% of the time, so this doesn’t bother me, but it’s worth noting if you prefer to sit while working.

Supply List
There are certainly places to cut corners when making this table that would lower the final cost. There's also steps that can be skipped or different sized materials to buy that would change the look of the final product. But this is not a blog post on thrifty woodworking, it's a blog post on how I made this exact table.
Note: This post does contain affiliate links. If used to make a purchase, I may earn a small commission. Every single link provided is the actual product I used, and I can personally vouch for the quality of the final result.
Materials
- 1 6ft x 3ft x 3in Unfinished Butcher Block Counter Top
- 4 3"x3"x3ft Square Unfinished Poplar Boards
- A '3" x 3" square' actually measures to 2.5" x 2.5"
- 3 19/32" x 4ft x 8ft BC Sanded Pine Plywood Boards
- 11 1" x 3" x 8ft Common Boards
- 2" caster wheels, Set of 4 (150lb load capacity/wheel)
Sanding
- Sander
- Assorted Grit 5" Disc Sanding Discs
- Assorted Sanding Sponges
- Wood Patch
- Plastic Paint Scraper Set
- Goggles
- Mask
Painting
- Paint Sprayer
- Viscosity Cup
- Paint Strainers
- Extra Fine Sanding Sponges
- Painters Pyramids
- Plastic Drop Cloth
- Vaccuum
- Tack Cloth
- Satin or Semi-gloss Water-Based Polyurethane or Polycrylic
- Behr Ultra Interior Semi Gloss Paint & Primer (Whisper White)
- I think we used 2.5 gallons total with two or three layers of paint
- I found somewhere that this particular mix is close to "Ikea White", and I can attest that it is a pretty pleasant soft white color

Assembly
Let's Make a Table
1 - Cut Materials
- Butcherboard Countertop
- 11" off the length of the butcherboard countertop (this required some help from a family friend, as the butcherboard is hefty)
- Plywood Boards
- Cut to 3ft x 5ft (36" x 60")
- 2.5" x 2.5" squares cut from corners, to fit flush to the table legs
- If you're cutting skills are a little...questionable, make them 2.7" x 2.7" squares. Better to be a little wide than be too tight.
- This part was by far the most annoying, due to the leftover wood and corner cuts
- Table Legs
- Cut down to 30" (6" off)
- Planks
- From 8, cut 1 55" plank and 1 31" plank
- From 2, cut 3 31" planks
- From 1, cut 2 31" planks

- Final Cut Pieces List
- 1 butcherboard countertop 39" x 63"
- 4 3" x 3" x 30" square table legs
- 3 36" x 60" plywood boards, with 2.5" corner notches
- 8 55" planks
- 16 31" planks
After cutting, your pieces, I would recommend drilling all of the length and width planks with pocket holes on each end. Much easier to do this before they're painted.

2 - Sanding
Great things take time, and lots and lots of sanding. Note: Wear goggles and a mask for sanding. There will be oceans of sawdust floating around, and you'll find out very quickly how bothersome they can be in the eye and nose.
- First, sand all surfaces with a rougher, 120 grit sandpaper except the butcherboard. Sand in the direction of the grain, and pay special attention to the edges. Try so, so hard to keep the sander flat (to avoid rounding the corners).
- Sand with 220 grit. Depending on the wood, sand once or twice more with increasingly finer grits. Really take your time, as a smooth sanding finish is the key to a smooth paint finish.
- Wipe the edges of the boards and any imperfections with a damp cloth. Apply wood patch generously to the edges of the plywood and to any imperfections in the legs or planks with the putty knife. Just smear it right on there, and then swipe off the excess to get a flat surface. I wish I'd been much more heavy-handed with the wood patch the first time around; once the white paint is applied, all the minor imperfections jump into view. Let dry completely.
- Once dry, lightly sand once more over the patched areas with an extra fine grit.
- Lightly sand the the very corners to dull the sharpness.
- Vaccuum the pieces and surrounding area to remove as much dust as possible.
- Use a tack cloth on all surfaces of your wood pieces to pick up any pesky, lingering particles (you will be surprised how many hung on). The tack cloth will also snag on rough patches that need a little extra love.
- Wipe the peices with a slightly damp cloth.
3 - Painting
You can absolutely paint a table and achieve a smooth finish with a paintbrush. But it's a helluva lot faster and easier with a sprayer, and I have no regrets about investing in one.
- Set up a space to paint free from floating debris and bugs (a garage or protected outside corner is marvelous). It's not ideal to try to paint in very hot or very cold weather. The weekend I was free to paint happened to be 93 degrees and extremely humid, so there was a lot of sitting around, literally watching paint dry.
- Mix your paint and run it through the paint strainer. I skipped this the first time thinking 'this is brand new paint, what could possibly be in there?', and ended up splurting out tiny globs all over my freshly sanded surface.
- Prop up your pieces so that you can access the edges. I used painters pyramids for the plywood pieces and was able to stand the legs upright. For the planks, I layed them across two long pieces of scrap wood. Swap out the scrap wood between paint layers or your planks will stick to them.
- Using the viscocity cup, thin your first 'primer' layer of paint to 40 seconds. If you are using a water-based paint, you can thin with just water. If your paint is oil-based, you'll need a real paint-thinning medium.
- For all pieces except the butcherboard countertop, completely cover one side and the edges with a thin layer. It might look a little splotchy or streaky but resist going thicker - that is just the wood soaking up the first layer of paint. Let dry completely and flip over to do the other side.
- I used the green tip from the HomeRight Super Finish Max and it worked like a dream.
- Depending on the weather, by the time you paint one side of all your pieces, the pieces you started with should be dry enough to flip over. This is handy because if you have to rest for more then 30 minutes, you have to stop and clean the nozzle of your paint sprayer. Annoying, but not as annoying as ruining your paint sprayer.
- If you notice a drip, wait for it to dry completely. Then, carefully use a single edge razor blade to remove, and sand gently.
- By hand, use a fine grit sanding block on the entire surface. Be careful at the edges - you don't want to take the corner paint completely off or accidentally start to round the sides.
- Vaccuum to remove dust.
- Thoroughly run a tack cloth over every surface. Gently sanding and using a tack cloth in between paint layers will make all the difference between looking like a 'DIY' project and a professional piece of furniture.
- Thin your paint to 25-30 seconds for your remaining paint layers.
- Paint a thin second coat. Keeping the coats thin helps avoid drips running over the edges or pooling unevenly on top.
- Again, use a fine grit sandpaper by hand, being careful around the edges.
- Vaccuum to remove dust.
- Thoroughly run a tack cloth over every surface.
- Spray a third coat and, if necesssary, repeat the sand/tack/paint process for a fourth coat.
4 - Protecting
Adding a protective finishing was a no-brainer; I needed this baby to be durable and easily cleaned. I chose not to stain or finish the butcherboard at all because I love the look of the natural wood (and I'll just sand off any spills or scratches when the time comes).
- Very gently, run an ultra-fine sanding sponge over the surfaces.
- Vaccuum to remove dust.
- You got that right, time to tack cloth again.
- Switch to the blue tip for spraying polyurethane or polycrylic. Spray a fine coat of polyurethane on all pieces, except the butherboard.
- Sand lightly. With polyurethane, this step is very important because without sanding between layers, the polyurethane will have nothing to grab onto.
- Vacuum...again.
- Tack cloth...again.
- Repeat steps 4-7 one more time for the second coat of polyurethane.
- Spray the final layer of polyurethane and do not sand anymore (Thank God). If you sand the final layer, you'll end up with a sort of cloudy finish. Let dry and voila!

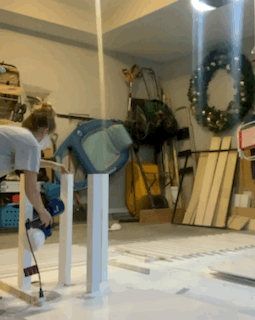
4 - Assembling
- Place your four leg posts upright. Attach two 'length' planks, flush with the bottom and pocket holes facing up.
- Attach a 'width' plank at either end and two more width planks evenly spaced in the center. Again, flush with the bottom and pocket holes facing up. Hint: It was easier to attach all width planks to one side, and then all to the other side.
- Flip upside down and attach the wheels at the corners.
- Drop the first shelf panel right down on top of it. Because of the weight of the plywood and the structure of the legs, I didn't bother actually fastening down the plywood.
- Mark the height of the second shelf on the inner corners of the legs. Add length and width bars as before.

- Drop the second shelf panel on top.
- Mark the height of the third shelf on the inner corners of the legs and add length and width bars.
- Drop the third shelf panel on top.
- Attach length and width bars at the very top of the legs. These are important as it helps the legs bear the weight of the butcherboard top and pulls the whole table securely together.
- Add the butcherboard on top. Because it's so heavy, it holds itself in place very well. I added four screws at each corner for good measure; right through the bars and into the butcherboard.

Ta-da! The most beautiful cutting table that there ever was! Don't hesitate to drop any questions in the comment section below.
Resources
I certainly did not figure out the table construction all on my own. Here is a list of the invaluable blog posts that guided me through different steps of the process.
DIY Candy: How to Use a Pocket Hole Jig (Kreg Jig)
Jen Woodhouse: 4 x 8 Workbench and Outfeed Table
Houseful of Handmade: How to Get A Smooth Professional Paint Finish on Furniture
Sawdust Girl: How to Paint Plywood Edges
Bob Vila: Polycrylic vs Polyurethane
The Gathered Home: A Rookie's Guide to the HomeRight Finish Max
House Becoming Home: HomeRight Super Finish Max Sprayer
HomeRight: How to Paint with Polyurethane
